Basics of Creating Tables in Microsoft Word
Tables are an essential tool for organizing data and presenting information in a clear and concise manner. Microsoft Word provides a variety of table-creation options to meet the needs of any document.
Creating a Simple Table
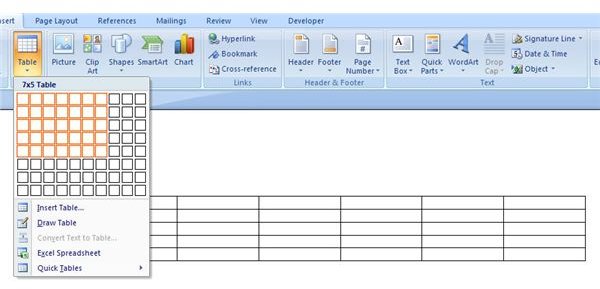
To create a simple table, follow these steps:
- Open Microsoft Word.
- Click the "Insert" tab.
- In the "Tables" group, click the "Table" button.
- A grid of cells will appear in your document.
- Use the mouse to select the number of rows and columns you want in your table.
Adding and Editing Table Data
Once you have created a table, you can start adding and editing data:
- To add data, simply click on a cell and type your text.
- To edit data, click on the cell you want to change and make the necessary edits.
- To resize a cell, drag its borders using your mouse.
Formatting Tables
You can enhance the appearance of your tables by applying formatting options:
- To change the cell style, select the cells you want to format and click the "Table Design" tab. Choose from a variety of built-in styles.
- To add borders or shading, select the cells you want to format and click the "Borders" or "Shading" buttons in the "Table Design" tab.
- To merge or split cells, select the cells you want to combine or divide and click the "Merge Cells" or "Split Cells" buttons in the "Table Tools" tab.
Inserting and Deleting Tables
To insert a table in an existing document, place the cursor where you want the table to appear and follow the steps above to create a new table.
To delete a table, select it and press the "Delete" key.
Tips for Creating Effective Tables
- Use tables to present data that is clearly organized and easy to read.
- Keep tables concise and avoid unnecessary details.
- Use consistent formatting to create a professional appearance.
- Consider using alternating colors in rows or columns to enhance readability.
- Proofread your tables carefully before finalizing them.


